ALCON BRAKES - INSPECTION & REBUILD
Overview-
The Alcon brakes supplied on the Racing Puma are fantastic race spec 4 pot calipers with superb stopping power when properly maintained. They are however not without fault for three main reasons as follows:
-
As a race spec caliper they do not have dust shields on the pistons like commercial brake calipers, merely a scraper seal in front of the main seal.
-
they are made of aluminium which was not painted on the inner face of the caliper and is prone to corrosion.
-
All the bolts and fittings are steel which is subject to electrolytic action with the aluminium.
Removal-
Unbolt the caliper with a 17mm spanner via the two bolts to the rear of the hub
Gently ease the caliper free of the disk
Use a pad spreader to push back the pistons
Clean and inspect the caliper, looking for any corrosion on the piston. Remove the pad rails and clean away any corrosion and apply some paint finish to prevent further corrosion forming.
Test the operation of the pistons by slowly pumping the brake pedal to see that all pistons are moving, if they are not perform a more thorough rebuild as outlined below.
Caliper Rebuild-
If at all possible push all pistons out as far as possible on the car by pumping the brake pedal, utilising a block of wood or cramp to stop them being fully pushed out.
Remove the caliper from the car as outlined above.
Remove the bleed nipples and bridge pipes using an 11mm socket, usually it is easier to cut the bridge pipe and use a socket on this as well as 9 times out of 10 they are scrap and need replacing.
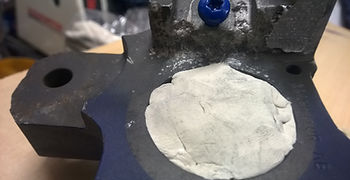
Place the caliper in a vice and proceed to part the shells by removing the 6 allen bolts on the face of the caliper.
This can sometimes be very difficult as over time with water and salt exposure they “weld” themselves in to the caliper. Take your time and if they won’t move with persuasion (I always uses a 3ft socket extension to gain more control), try the following method. Place the calipers in a bag and leave in the freezer for a week, then remove them and rapidly heat up the caliper using a heat gun then try and remove the bolts again. They do often snap in the caliper, if this is the case they will need to be drilled out and helicoiled and they are very hard bolts to drill out.
Once split the caliper shells and remove the pistons.
I would recommend blasting with a fine media (with the bores masked and filled with Plasticine) as what appears to be surface corrosion can often be much deeper. Depending how deep the corrosion is they may need welding and remachining, I have only found one welder capable of doing this and they are C & S Techweld Services in Birmingham. Following welding they will then need to be milled back to the original profile.
Clean out all threads using the appropriate UNF or metric tap (3/8unf for bleed nipples and bridge pipes, M8 for shell bolts)
Once the shells are refurbished they will either need painting or powdercoating, in either case the bores will need masking off. I use a 2K paint if spraying or standard powdercoat. The callipers were originally made in two batches, earlier calliper were a lighter blue RAL 5000, later calipers were darker.
Once the painted shells are ready, the next stage is cleaning. Ensure the bores and seal recesses are spotlessly clean, if necessary use a pick to clean out the slots.
Refit the pad rails using new bolts (stainless steel are preferred in this instance), ensuring they fit tight to the caliper.
Fit the new seals in the shell recesses, scraper seat to the outer face, main seal to the inner face.
Carefully refit the pistons using a small smear of specialist calliper grease, being careful not to push out the scraper seal.
Once all pistons are in place, place the shells together and bolt up with new 12.9 grade bolts, it is worth using copperslip on the treads to aid with future disassembly.
Finally fit a new bridge pipe and bleed nipples.
Bolts required-
unf 3/8 brake nipples x4
allen socket head / cap head;
m8 x60mm x4
m8 x70mm x8
m6 x100mm x2
m6 lock nut x2
pad rail bolt replacement m5 x8mm socket head allen
M10 x ?? 10.9 bolts x4
M10 'Philidas' all metal lock x4
Refitting-
Clean down the disk with a coarse emery paper, followed by brake cleaner and put back on the hub flange.
Bolt the caliper in place with the two M10 bolts (17mm spanner)
Prepare the new pads, by cutting 45 degrees off the leading edge of the pad shim on the rear of the pad and remove a small amount of material off the leading and trailing edge of the friction material.
Place the pads with the friction material touching the disk from the front of the calliper and place the pad retaining bracket in place and bolt up with the m6 bolt to secure.
Bleed the brakes until the pedal is firm, it is usual for the first press of the brake pedal after the engine is started to be a little soft.
FRP brakes must then be bedded in properly as follows:
Drive around town 'normally' (i.e dont stamp on the brakes or sit on them at traffic lights) for half an hour to get the brakes warm. Then go out onto the open road and starting from 30mph increase speed to 40mph and then brake 'normally' (i.e dont stamp on them just take some speed off).
Do a couple of these and then go to 40mph increase speed to 50mph and then brake normally again. Keep repeating these a couple of times before moving to 50 to 60mph and finally 60 - 70mph. When you get to 50-60 do a couple of braking stops (which slow the car down steadily on the brakes (not emergancy stops or stamping on the brake pedal, just gradually braking). You should feel the brakes gradually come in until the optiminum. When you 've finished the cycles let the car stand for a good 10 - 15 minutes before returning home.
Pad and Disk Selection-
Disks – Both Pumabuild and Hispec produce bell and rotor disks for the Racing Puma, these are the only real solution for the car now as original disks are no longer available. Other disks have been used but have to be shimmed out to fit and are already at the minimum disk thickness of 26mm so not recommended.
Pads – Original material was Mintex 1144, whilst the pad profile is the same as a number of other vehicles, the pad material is thinner, so often need to be machined down to fit.
Racing Pumas are prone to brake squeal and friction material compound can have a influence on this.
A number of owners rate Textar pads, or Mintex 1142 but expect to pay £80 a set, the only cheaper alternative that I have found that are good are EBC Ultimax which are less than £30 a set and in my opinion are as good as the original.